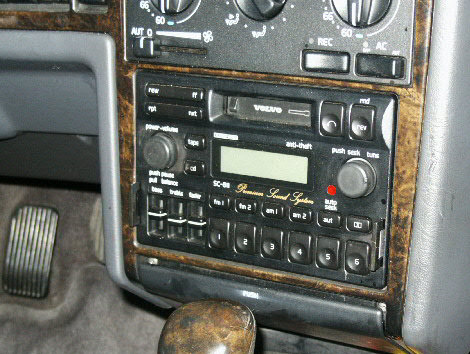
Radio Light Bulb Replacement Instructions - SC-815, SC-816, SC-813, SC-715, S70, V70, 850, 960, S90, V90

As these cars age, so do the lights in dash and radio. They are hoped to last forever but that doesn't happen. Several lights were out in our S70 SC-816 radio/CD/tape receiver, including the one in the display (most annoying). The bulbs are the same as the ones that go into the switches but they are uncased in different sockets. I actually have the bulbs the have the long leads coming off of them so I could replace the bulbs in the base assemblies.
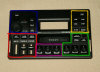
The radios have a total of 7 bulbs. One of them is a custom bulb that flashes in the Anti-Theft/CD In Deck spot. One if them is in the LED display. The other 5 are installed in the control board with quick release sockets and shine through the panel in 5 regions. See step 1 below for details.
The strange thing about the radios is that they have two different faceplate styles. One pulls control board with the faceplate and the other leaves the control board on the radio assembly. You will not know which you have until you tear into it. The job can be done in 1 hour.
You will also need the radio code. All Volvo SC series radios have a security code needed to reactivate it. You can read more about it here if you need to. Click Here
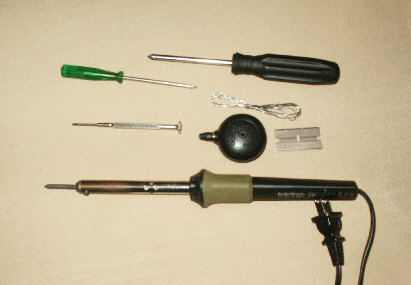
Tools Needed:
| Coin | Phillips Screw Driver |
| Small Flat Tip Screw Driver | Bulbs (you can get them here.) |
| Razor or Scissors | |
| If you need to replace the bulb in the display you will also need | |
| Solider Iron | Solider |
| Blower (to help you remove solider from the board hole) | |
Instructions:
-
Get the radio code.
-
Look close at your radio and determine what bulbs you have out. There are 7 bulbs and 5 of them light up the panel, 1 of them is a flashing light, the last 1 lights up the LED display. Determine how many bulbs you have out.
-
Remove the radio from the dash. Push in on the quick-release tabs in both sides of the radio and pull it out.
NOTE: If you have a good grain shifter knob, you may want to put a cloth or something on the shifter knob to avoid scratching it up with the bottom of the radio.


-
Unplug the wires on the back of the radio to completely remove it from the car. There are usually 2 wire harnesses, maybe a cd changer plug, maybe a power amp plug and 1 or 2 antenna wires.

-
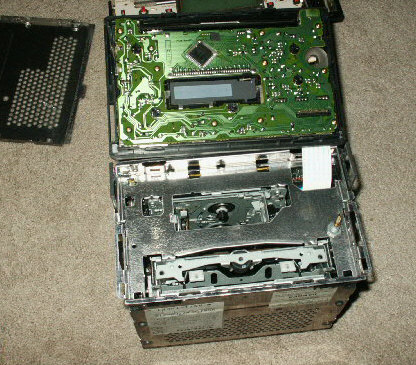
Take the radio to your work table and remove the faceplate. Remove the volume and tuning knobs (may not have a tuning knob). It has 4 screws on the right side, 3 screws on the left side, and 2 tabs on each edge to get it loose. This is also where you find out which faceplate/control board you have. When you get the faceplate loose from the frame of the radio and pull it away, you will see if the control board is attached to the faceplate, some are not.
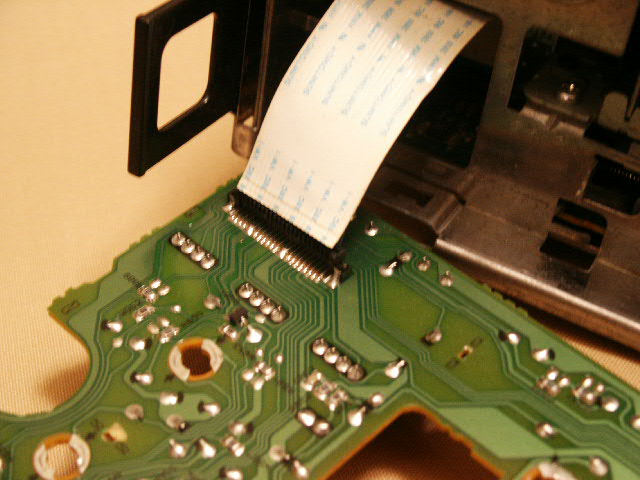
NOTE: Be careful when you get it loose. It has a wire ribbon attached to it and you do not want to damage the wire connection.


-
Once you have it loose, you may or may not have to unplug the ribbon. If your control board is attached to the RADIO, you WILL NOT have to unplug the ribbon. If your control board is connected to the FACEPLATE you WILL have to unplug it from the ribbon. I actually have both types.


NOTE: If you have the type of radio that has the control board is attached to the radio, you will have to remove the control board from the radio casing to replace any of the lights. If your control board is still attached to the faceplate, you can replace the main 5 bulbs, you can access them from the back of the faceplate/control board. -
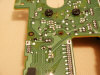
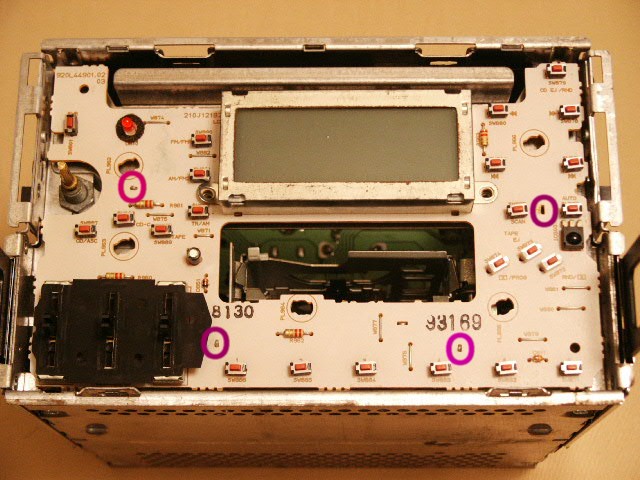
If you have the type of radio that has the faceplate attached to the radio, remove the faceplate from the radio assembly. Using the small flat tip screw driver, adjust (bend) the 4 securing tabs (area in purple) so they will release the control board from the radio frame. Once they are aligned with the slots, lift the control board from the radio frame. Then unplug the ribbon from the control board.


-
Identify the bulbs that need to be replace and remove the bulb assembly from the control board. They twist out 1/4 turn. If you have direct replacement assemblies simply swap them out and you are done and ready to reverse procedures to re-install the radio. If you have raw bulbs like I did, you will have to replace the bulbs in the sockets and then install them in the radio control panel.

NOTE: You may have to remove the blue cover from the tip of the bulb.
NOTE: If your LED display is also out, continue with the steps below. -
You will need to remove the control panel from the faceplate if it is attached. Remove the 11 screws and separate the parts.

-
Now you need to remove the metal frame from the LED display. Bend the 2 green tabs so they will release the metal frame from the control board. Then use the solider iron to remove the solider from the metal frame that attaches the frame to the control board. It has 4 spots in yellow.


-
Identify the light in the control board and remove the solider from the light bulb.


-
Once the bulb is out of the board, remove the blue tip and black base and put them on the new bulb.


-
Install the new bulb in the control board and solider it in place. Be careful not to get to much solider on the board or you will connect the leads and short the bulb. Once in place, trim the bulb leads on the back side of the control board.
-
Solider the metal frame back in place on the control board, in reverse procedures, put the radio back together and install it in the car. Once in the car, turn the key on and enter the security code to use the radio. If you enter the WRONG code the radio will display REPEAT. If you enter the wrong code in 3 times it will lock you out for a couple of "ON" hours.
NOTE: Make sure you have the correct code. You can get it from the dealer.


Please leave a tip, see the bottom of this page.
End of instructions.